These are instructions for setting up your home computer to connect to your work desktop.
Requirements:
- An off-campus computer (laptop issued by SPSCC)
- An internet connection at home.
- An active connection to our VPN. You can only connect to your remote (office) desktop while you are connected to our VPN on your laptop.
- A computer at work that is turned on and you know the computer name. Contact IT Help Desk if you need help determining the computer name or if you need the computer turned on.
Steps:
- Connect to the VPN before continuing with this guide. For more information, please see the support article https://support.spscc.edu/connect-vpn
- Open the Remote Desktop Connection (RDC) application on your home PC:
- Click the Start Menu and type "Remote Desktop Connection".
- Click "Remote Desktop Connection"
- Configure RDC to connect to your work PC:
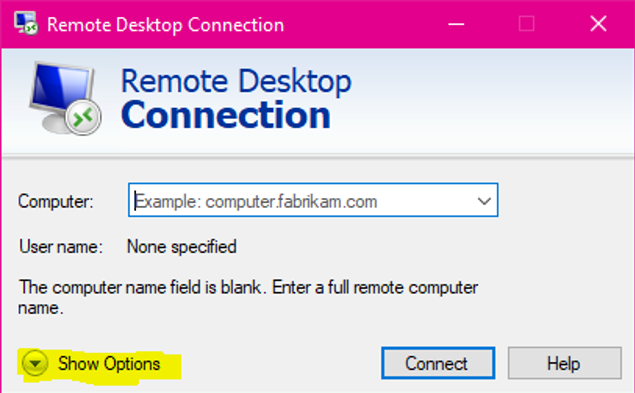
- Click "Show Options" in the lower left corner of the window to open additional options:

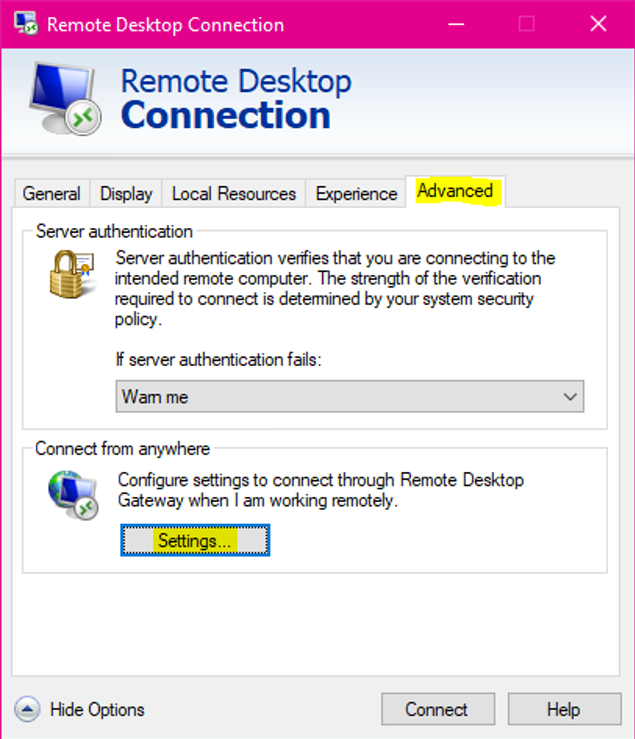
- Click the "Advanced" tab.
- Click "Settings..." in the "Connect from anywhere" section.

In the window that appears, ensure that "Automatically detect RD Gateway" radio button and type "Use my RD gateway credentials" are filled in/checked. Leave the server name portion blank/unselected.
- Click "OK".
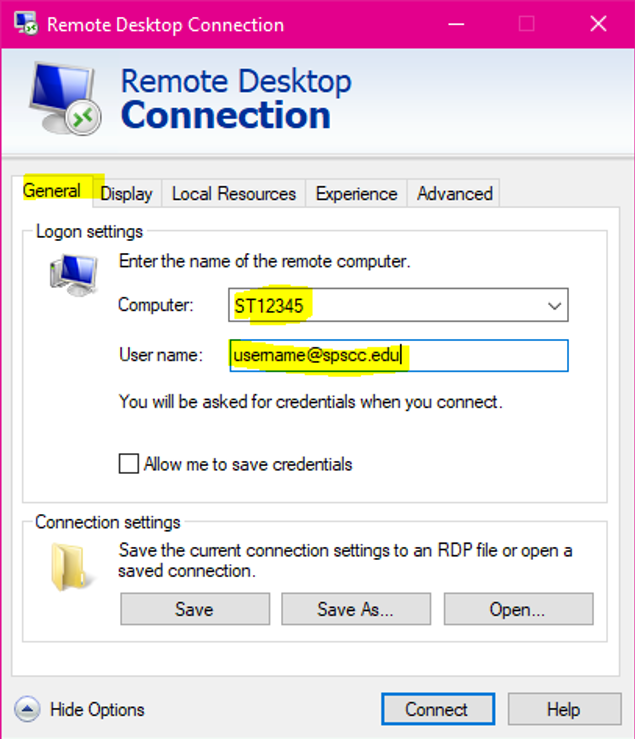
- Click the "General" tab in the original Remote Desktop Connection window.

- Enter your on-campus computer's name in the "Computer:" field.
- Enter your username (your SPSCC email address) in the "User name:" field.
- Leave the "Allow me to save credentials" checkbox UNCHECKED. Checking this box is a security problem.
- Click "Show Options" in the lower left corner of the window to open additional options:
- Sign in:
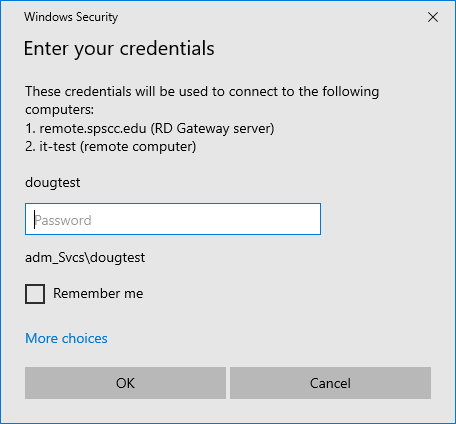
- When you click "Connect", you will be prompted for credentials:

- Enter your email credentials. Do NOT select the "Remember me" checkbox. (This is another security issue).
- These settings should now be your defaults, and will be offered to you the next time you run Remote Desktop Connection.
- When you click "Connect", you will be prompted for credentials:
- Ending your Session:
- There are two ways to exit your session. You can "sign out" inside your remote desktop using it's startup menu, or you can click the "X" on the "Remote Connection" banner at the top of your remote session window:

- It is most important that you do NOT Shutdown your remote machine. If you do, you won't be able to reconnect until someone goes and physically turns it on.
- There are two ways to exit your session. You can "sign out" inside your remote desktop using it's startup menu, or you can click the "X" on the "Remote Connection" banner at the top of your remote session window:
If you are having trouble connecting, getting an error, or need to edit your RDP connection settings, follow these steps:
- Right-select you RDP file OR open Remote Desktop by searching "Remote Desktop" from the start menu and selecting the app
Once RDP is opened, select the "Advanced" tab, as shown. If you do not see the "Advanced" tab, you may need to select the "Show Options" drop down button on the bottom of the RDP window
In the center of the Advanced tab, select "Settings" in the "Connect from Anywhere" section
- Clear out all the server name settings
- Uncheck the "User my RD gateway credentials for the remote computer"
- Check "Automatically detect RD Gateway server settings.
Select "Ok"
- After this dialog box closes and you are back on the main RDP window, select the "General" tab
- Do NOT change the Computer or User name here - This is specific to your computer and user name. If the computer name gets deleted or you do not know your computer name, please contact the IT Help Desk for assistance.
At the bottom of the general window, select "Save" - This will save all of your new settings and allow you to save the RDP connection as a desktop/shortcut icon for ease of use
IT Services Help Desk
if you run into any issues following this guide, please contact the IT Services Help Desk to resolve them.
We're open from 7:30am to 5:30pm weekdays:
- at 360-596-5544
- or helpdesk@spscc.edu
- or even visit us in person on the first floor of Building 22
